Prepare Internet Information Services
Summary: How to: Enable Internet Information Services (IIS).
Topic Last Update: 12/16/2017 8:28:13 AM
Overview
In order to host the DynThings web portal, you will need to enable Internet Information Services (IIS) on the server. IIS comes with Windows but is not installed or turned on by default. Enabling IIS on the server creates a Web site server so that clients can use HTTP or HTTPS (for SSL) to connect.
Before You Begin
Ensure that you have installed one of the editions of Windows which support IIS before you proceed. Not all IIS features are supported on all editions of Windows. Home, Basic and Starter editions include only limited basic features of IIS.
Also be sure that you have administrative user rights on the computer. By default, you do not have administrative user rights if you are logged on as a user other than the built-in administrator, even if you were added to the local Administrators group on the computer (this is a security feature in Windows Server 2008 called Local User Administrator). Log on either to the built-in administrator account or explicitly invoke applications as the built-in administrator by using the runas command-line tool.
Note that you can run runas /user:administrator cmd.exe so that every application you run from that command line will be elevated, eliminating the need to use the runas syntax from that command line.
Install IIS 7 or Above
1. To open the Windows Features dialog box, click Start, and then click Control Panel.
2. In the Control Panel, click Programs.
3. Click Turn Windows features on or off. (side panel)
4. You may receive the Windows Security warning. Click Allow to continue. The Windows Features dialog box is displayed.
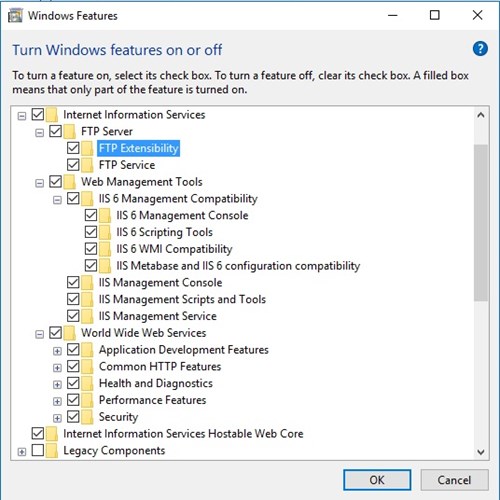
5. Expand Internet Information Services. Additional categories of IIS features are displayed. Select Internet Information Services to choose the default features for installation.
6. Select the check boxes for all IIS features you want to install, and then click OK to start the installation.
7. The progress indicator appears.
8. When the installation completes, the Windows Features dialog box closes, and the Control Panel is displayed.
9. IIS is now installed with a default configuration based on your Windows edition. To confirm that the installation succeeded, type the following URL into your browser, http://localhost.
Resources:
https://www.iis.net/